 Join Nestles Chocolatier to receive a coupon for a free bag of Nestlé Chocolatier™ Baking Chocolate.
http://nestlechocolatier.fanspeak.net/?C1853_537733
Join Nestles Chocolatier to receive a coupon for a free bag of Nestlé Chocolatier™ Baking Chocolate.
http://nestlechocolatier.fanspeak.net/?C1853_537733

8/31/2006
8/28/2006
Creating my Snowmen Pop-Up Card
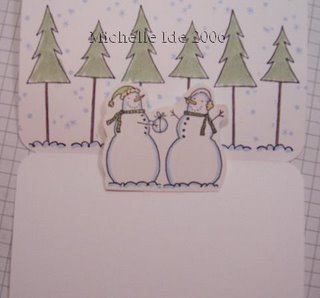
I've had quite a few people ask how to create the Snowmen Pop-Up card that I posted so I made a picture tutorial, I hope the directions are clear. It is really a simple card once you've seen it done. Let me know how you like it.
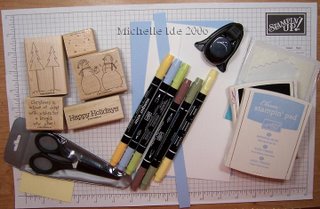 Here are the items I used to create it and the basic recipe :
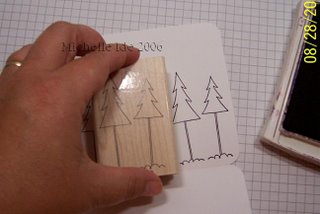 Fold both of the large sheets of cardstock in half (I corner rounded both). Then stamped the trees on the top half of the whisper white.
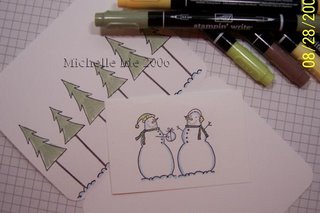 Stamp the snowmen image on the square piece of Whisper White and colored all of the images with the markers.
 Create a mask of the trees using a Post-It Note and use it to stamp snowflakes on the background.
 Cut out the snowmen image. You don't have to cut too closely, as you can see I leave about an 1/8" white border around them.
 Fold the Whisper White cardstock and cut two slits, about ¾" long and ¾" apart, on the folded edge of it.
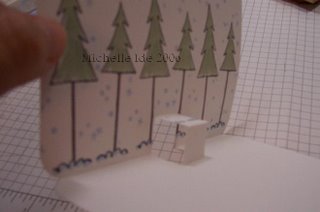 Push the tab back into the card and press to create sharp creases.
 Apply glue to only the bottom half of the tab.
 Attach the snowmen slightly above the crease of the tab.
 Glue the Whisper White to the inside of the Bashful Blue and add the finishing touches. I stamped snowflakes on the outside of the card with Bashful Blue, Created a title and attached it to the card with dimensionals and then stamped a sentiment in front of the snowmen.
 Here are the items I used to create it and the basic recipe :
- Bashful Blue cardstock 8½" x 5½"
- Whisper White cardstock 8¼" x 5¼"
- Whisper White cardstock 2½" x 2½" (for stamping the snowmen image)
- Bashful Blue 2 5/8" x 5/8" (for layering the title)
- Whisper White 2½" x ½" (for title)
- Basic Black ink
- Bashful Blue ink
- markers
- Post-It Notes (for masking the trees)
- Scissors (for creating the pop out tab and for cutting out the snowmen
- Adhesive (I use Tombow Mono Multi Liquid glue)
 Fold both of the large sheets of cardstock in half (I corner rounded both). Then stamped the trees on the top half of the whisper white.
 Stamp the snowmen image on the square piece of Whisper White and colored all of the images with the markers.
 Create a mask of the trees using a Post-It Note and use it to stamp snowflakes on the background.
 Cut out the snowmen image. You don't have to cut too closely, as you can see I leave about an 1/8" white border around them.
 Fold the Whisper White cardstock and cut two slits, about ¾" long and ¾" apart, on the folded edge of it.
 Push the tab back into the card and press to create sharp creases.
 Apply glue to only the bottom half of the tab.
 Attach the snowmen slightly above the crease of the tab.
 Glue the Whisper White to the inside of the Bashful Blue and add the finishing touches. I stamped snowflakes on the outside of the card with Bashful Blue, Created a title and attached it to the card with dimensionals and then stamped a sentiment in front of the snowmen.
8/27/2006
Christmas is coming!!
There were Christmas Carols being played, Christmas cookies being eaten and cards being stamped. It's beginning to feel a lot like Christmas . . . well, if it wasn't 80° outside it would have. I had my first Christmas Card Class yesterday and it was so much fun. The 12 cards were finished in record time with stampers singing their favorite carols and munching on decorated sugar cookies.
Here are the cards we made:
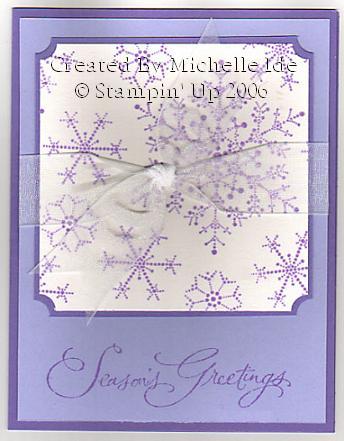
 This one was a big hit and surprised my stampers at how simple is really is. I just love this set and have already designed 2 more cards with it for my Sept. and Oct. classes. The colors are very soft IRL and the background snowflakes are actually Bashful Blue and not the grayish color that they look like.
 The colors for this card are straight off the color wheel. I really like how it turned out. The only problem yesterday with this one is that my Real Red is so juicy that it took a bit for it to dry.
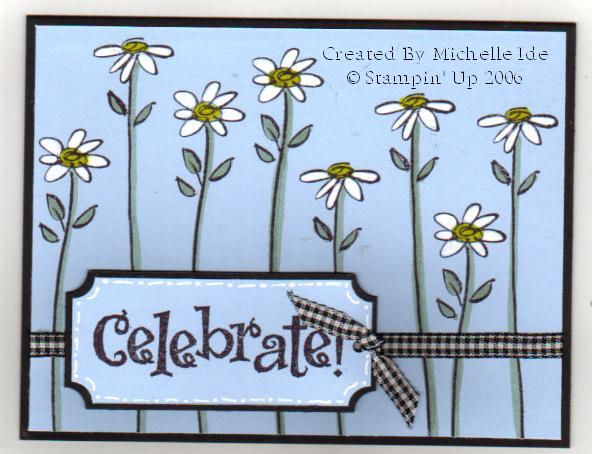
 This one was inspired by JulieHRR. I changed it up a bit and added a little more color. Such a simple yet beautiful card. I love it!!
 I originally did this card in Lovely Lilac/Almost Amethyst but when I went to cut the cardstock for the class I was short by 4 sheets. So I changed it up to Perfect Plum/Pale Plum. I love, love, love this stamp set. I might be my favorite new holiday set from the current catalog.
 This one was a big hit and surprised my stampers at how simple is really is. I just love this set and have already designed 2 more cards with it for my Sept. and Oct. classes. The colors are very soft IRL and the background snowflakes are actually Bashful Blue and not the grayish color that they look like.
 The colors for this card are straight off the color wheel. I really like how it turned out. The only problem yesterday with this one is that my Real Red is so juicy that it took a bit for it to dry.
 This one was inspired by JulieHRR. I changed it up a bit and added a little more color. Such a simple yet beautiful card. I love it!!
 I originally did this card in Lovely Lilac/Almost Amethyst but when I went to cut the cardstock for the class I was short by 4 sheets. So I changed it up to Perfect Plum/Pale Plum. I love, love, love this stamp set. I might be my favorite new holiday set from the current catalog.
8/20/2006
The perfect gingham knot!
I adore ribbon! I don't have a lot (unless you think that owning everyone that SU! sells a lot) but I use it on almost every card that I make. For the longest time making a simple gingham knot frustrated the bajimanies out of me! I practiced and studied cards and searched the internet and then finally figured out what works best for me! I now can attach a perfect square knot of ribbon to my cards and be confident that it will stay on the card.
Want to know my secret? Pictures coming soon!
Roses in Winter
If you could only have one stamp set, which would it be?
For me it would be Roses in Winter. I use it almost every day and am never disappointed by how my cards or pages turn out. The funny thing is, I don't even own it. I borrow it from my mother for a few days, give it back and then (usually the next day) I go and get it again.
 Here's a card that I made for my August Stamp Club Class with it. They all loved it and two of them ordered it!
 Here's a card that I made for my August Stamp Club Class with it. They all loved it and two of them ordered it!
8/11/2006
I have a class tomorrow and needed to create two more cards for it.
So, here they are :
 It is so easy for me to create floral cards but other types are a challenge. I first made this as a blue card but one of the other projects is totally blue so I tried it in green, my favorite Green Galore. I really like it. I hope the girls do too!
 The colors of this card (Chocolate Chip, Buckaroo Blue, Marigold Morning) are from this weeks Color Combo Challenge on SCS. I needed to add more of the Buckaroo Blue to the card so I took a stiff bristle paint brush and used it to add some soft accents on the edge of the top layer. It's hard to see but is so pretty IRL. I think that it needs something else (like ribbon) but one of my stamping girls thinks that I use entirely too much ribbon (as if that could ever happen) so once in a while I try to make one with out it. It is physically painful to glue them together with out any! LOL
8/06/2006
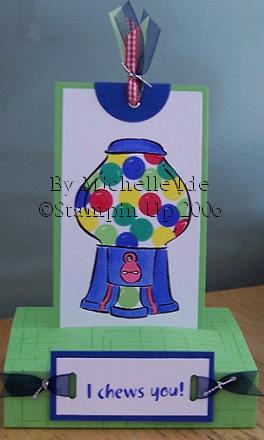
 This was inspired by Shelly from http://www.stampandscrapwithshelly.blogspot.com/. I never thought to use the white gel pen to color with. Duh! I really like how it turned out and will be using it for a class next month.
 This one is so simple but I love it. One of my sisters loves the color purple so I always try to send her birthday, anniversary and holiday cards that reflect that. I'll be using this for my Christmas Stamp-a-stack at the end of this month. I hope that they like it as much as I do.
Subscribe to:
Comments (Atom)